
Table of Contents
- Understanding Tri Glide Trunk Security Fundamentals
- Choosing the Right Locking Mechanism for Your Trunk
- Installing and Securing a Motorcycle Seat Lock for Harley Touring
- Step-by-Step: Installing a Harley Davidson Trunk Lock Replacement
- Internal Organization and Weight Distribution for Secure Storage
- Weatherproofing and Maintaining Your Trunk Seal
- Common Mistakes to Avoid When Securing Trunk Storage
- Frequently Asked Questions
Last Updated: September 4, 2026
Securing a Tri Glide trunk goes beyond simply closing the lid. The factory latch prevents casual opening, but a determined thief with basic tools can compromise it in moments. Understanding how to secure tri glide trunk storage properly means addressing both the locking mechanism and how you organize cargo inside. This guide from Robert Becker Design covers the hardware upgrades, installation steps, and internal strategies that keep your touring storage protected.
Most riders focus on one layer of security and stop there. Effective trunk security requires three layers working together: a hardened locking mechanism, proper weight distribution, and a weatherproof seal that keeps contents protected.
Understanding Tri Glide Trunk Security Fundamentals
Trunk security starts with recognizing that the factory latch is a convenience feature, not a security device. The stock mechanism uses a simple key cylinder that can be picked or forced with a screwdriver. Upgrading to a dedicated locking system changes how the trunk resists tampering.
The locking pin and mounting hardware are the critical components. A hardened steel pin that seats deeply into the latch mechanism prevents prying attacks. When the pin engages properly, the lid cannot be lifted even if the latch itself is damaged.
Weight distribution plays a larger role in security than most riders expect. A trunk loaded unevenly places stress on the latch and hinge, which can cause the lid to sit slightly askew. That gap gives a thief a purchase point for prying tools. Balancing cargo keeps the lid seated flush and the locking mechanism fully engaged.
Choosing the Right Locking Mechanism for Your Trunk
The market offers several locking options for Tri Glide trunks, ranging from simple replacement cylinders to comprehensive security systems. A direct replacement cylinder matches the factory key and offers minimal improvement. A dedicated security lock with a unique key and hardened construction provides meaningful theft deterrence.
When selecting a lock, examine the materials and the locking mechanism design. Hardened steel internals withstand drilling and picking attempts far better than zinc alloy. Grade 8 bolts with thread lock prevent someone from simply unbolting the lock assembly (astm.org).
Evaluate the lock's resistance to common theft methods. Prying attacks are most common; a lock that seats deeply into a reinforced latch receiver resists this. For drilling attacks, look for hardened steel pins and a design that binds the cylinder to the housing if drilling is attempted.
Pull attacks, where a thief threads a screw into the keyway and yanks the cylinder out, are less common but devastating. For riders who park in high-theft areas, consider a lock with a shrouded keyway to protect the cylinder from this attack.
Match your lock choice to your parking environment. For secured garages or low-crime areas, a standard replacement lock with hardened internals is sufficient. For street parking or unfamiliar locations, invest in a lock with shrouded keyway protection and a latch receiver designed to resist prying.
Installing and Securing a Motorcycle Seat Lock for Harley Touring
A motorcycle seat lock protects more than the seat itself. On Tri Glide models, the seat secures access to the battery, fuse box, and trunk release mechanism. An unsecured seat gives a thief access to components that can disable your entire security setup.
Remove the existing seat mounting bolt, typically accessed from the side or rear of the seat. Insert the replacement lock mechanism into the mounting point, ensuring the locking pin aligns with the frame receiver. Apply thread lock to the bolt threads before torquing to specification.
If the locking pin does not seat cleanly into the receiver, the lock will bind and wear prematurely. Test the mechanism several times before reassembling the seat.
Step-by-Step: Installing a Harley Davidson Trunk Lock Replacement
A Harley Davidson trunk lock replacement requires careful handling of the trunk lid assembly and takes about 30 minutes with basic hand tools and a torque wrench.
Step 1: Access the latch mechanism. Open the trunk fully and remove the inner liner or access panel. Most Tri Glide trunks provide access to the latch from inside the lid. Set the liner aside carefully to avoid damaging the weatherproof seal.
Step 2: Remove the existing lock cylinder. Disconnect any linkage rods connecting the cylinder to the latch. Remove the retaining clip or bolts holding the cylinder in place. Pull the cylinder straight out; it may require slight twisting to clear the mounting bracket.
Step 3: Install the replacement lock. Insert the new cylinder into the mounting hole, ensuring the keyway orientation matches the original. Reconnect the linkage rods, verifying that the latch engages fully when the key is turned. The locking mechanism should operate without binding.
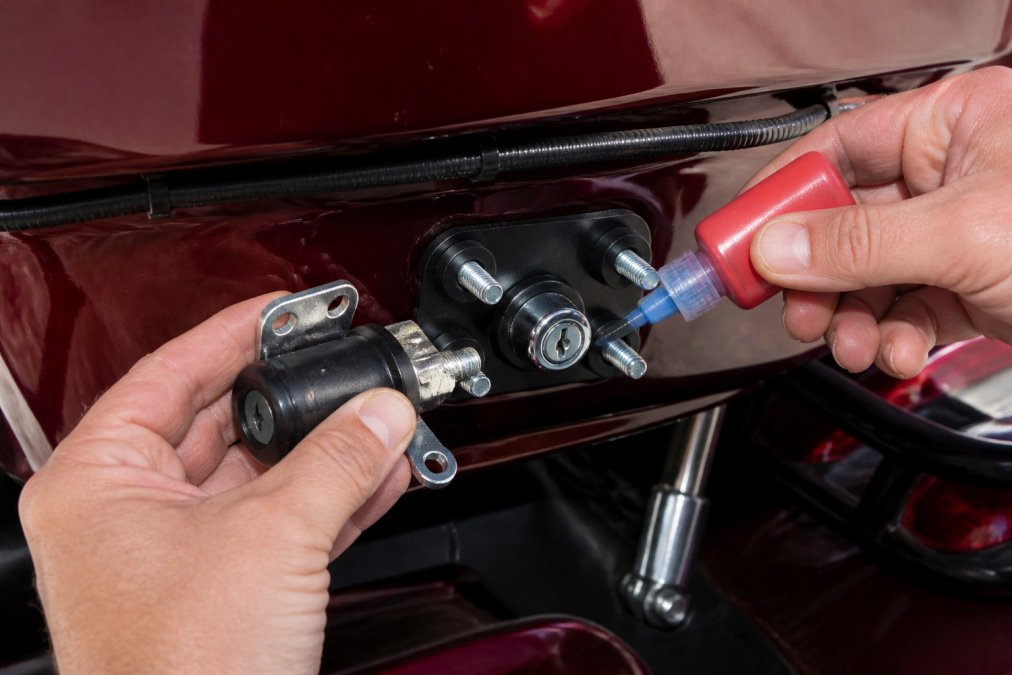
Step 4: Secure mounting hardware. Apply thread lock to all bolts and torque to the manufacturer's specification. Overtightening can strip threads in the plastic or aluminum mounting bracket; undertightening allows vibration to loosen the assembly over time.
Step 5: Test and reassemble. Cycle the lock several times with the trunk open, then close the lid and test from the outside. Verify that the lid seats flush and the lock engages with a positive feel. Reinstall the inner liner once you confirm proper operation.
Internal Organization and Weight Distribution for Secure Storage
The way you pack the trunk directly affects both how well the locking mechanism performs and how your trike handles on the road. Unbalanced trunk weight degrades trike handling and creates gaps that compromise the weatherproof seal and invite prying attempts.
A Tri Glide's trunk sits behind the rear axle, making it a leverage point for the entire vehicle. Uneven weight creates a yaw moment that the suspension must constantly correct, manifesting as pulling during straight-line riding and sluggish steering response in curves.
For security and handling, follow these weight distribution guidelines:
Load distribution by position: Place heavy items at the bottom center of the trunk, directly above the latch mechanism. Lighter items fill the upper volume. If you must carry asymmetric loads, position the heavier side toward the latch, not the hinge.
Maximum weight per side: Do not exceed a 5-pound difference between left and right sides of the trunk (sae.org). This threshold keeps the trike's yaw moment within the suspension's natural correction range. Use a bathroom scale to weigh items before packing, or estimate by feel: a full change of clothes and toiletries weighs roughly 3 pounds; a pair of riding boots, 4 pounds; a full tool roll, 8 pounds.
Total trunk capacity: Most Tri Glide trunks are rated for 40-50 pounds total capacity (harley-davidson.com). Do not exceed this limit. Overloading strains the hinge and latch, accelerates seal degradation, and places excessive leverage on the rear suspension. If you need more storage, use saddlebags or a top case instead of overloading the trunk.
Securing cargo inside the trunk: Start with a trunk liner that provides a non-slip surface to prevent cargo from shifting during rides. Use internal organization accessories, lid organizers, soft dividers, or cargo nets, to compartmentalize space and keep items from moving. This reduces how often you open the trunk at rest stops.
Weatherproofing and Maintaining Your Trunk Seal
A compromised trunk seal allows dust and moisture to reach the locking mechanism, accelerating corrosion and causing the lock to bind. Regular weatherproofing maintenance extends both the seal's life and the lock's reliability.
Inspect the trunk seal every few months for cracks, compression set, or debris. Clean with a mild soap solution and soft brush, then apply a silicone-based protectant to keep the rubber supple and maintain sealing pressure.
A seal that has lost its resilience allows the lid to vibrate and shift during rides, gradually wearing the engagement surfaces. Maintaining the seal keeps the lid stationary and preserves the locking mechanism's integrity.
Common Mistakes to Avoid When Securing Trunk Storage
The most common mistake is skipping thread lock on mounting hardware. Vibration from the road gradually loosens bolts, and a loose lock assembly can be pulled free with pliers.
Using the wrong mounting hardware for aftermarket upgrades can strip threads or leave insufficient engagement. OEM accessories use specific bolt lengths and thread pitches.
Neglecting the locking mechanism during routine maintenance is common. A lock that becomes stiff or gritty needs attention immediately. Lubricate with dry graphite or PTFE lubricant, never oil. If the lock continues to bind after lubrication, replacement is the safer option.
Do not treat security hardware as a one-time purchase. Include trunk security components in your annual maintenance checklist, as locks wear, seals degrade, and mounting hardware corrodes.
Securing your Tri Glide trunk storage requires attention to the locking mechanism, the seal, and how you pack. A quality lock from a manufacturer that specializes in motorcycle theft prevention, like Robert Becker Design's motorcycle security lineup, provides the foundation. Proper installation with thread lock and correct torque keeps it functional. Balanced packing protects both the lock and the seal. Regular maintenance catches wear before it becomes a vulnerability.
Securing your Tri Glide trunk storage protects more than your gear; it protects your ability to ride without worry. The right locking mechanism, installed correctly and maintained regularly, deters theft and keeps your cargo safe on every trip. Robert Becker Design has engineered theft prevention locks for Harley-Davidson and Indian touring models since 2012, with products designed by riders who understand what touring storage demands. Browse our selection of seat locks, saddlebag locks, and mounting hardware to find the security solution that fits your bike. Get started with Robert Becker Design and ride with confidence knowing your trunk is secure.
Frequently Asked Questions
How do I prevent unauthorized access to my Tri Glide trunk storage?
Start with a quality locking mechanism rated for motorcycle use, then reinforce it with OEM or aftermarket locks designed for touring trikes. Layer your security by combining trunk locks with travel bags that have their own compartment access controls. Additionally, park in well-lit areas and avoid leaving your trike unattended with visible high-value items like GPS units or biker gear inside. A reliable locking pin and properly installed mounting hardware make opportunistic theft significantly harder.
What's the difference between OEM and aftermarket trunk lock replacements?
OEM locks come from the manufacturer and fit factory mounting points perfectly, but may have standard locking mechanisms. Aftermarket trunk locks often feature upgraded security hardware, stronger materials, and enhanced locking pins designed specifically for high-theft environments. When choosing a replacement, verify compatibility with your Tri Glide's existing bolt installation points to avoid drilling new holes. Aftermarket options can offer enhanced cargo security for touring storage, especially if you frequently park in urban areas.
How much weight can my Tri Glide trunk safely hold?
Most Tri Glide tour packs safely hold between 30-50 pounds, depending on your specific model year and suspension setup. Exceeding this limit affects trike handling and braking performance. Distribute weight evenly inside the trunk and avoid loading all weight toward the back. Check your owner's manual for exact storage capacity specifications. Proper load distribution protects both your trike's performance and the integrity of your locking mechanism under stress during travel.
Can I install a trunk lock myself, or do I need professional help?
Most trunk lock installations require only basic tools like a wrench, screwdriver, and thread lock compound. Start by removing the existing lock or accessing the mounting hardware inside your trunk. Align the new locking mechanism with the factory bolt installation points, apply thread lock to bolts, and tighten securely. If you're uncomfortable working with mounting hardware or your Tri Glide has custom mounting points, a professional installation ensures proper alignment and security. Always verify that your new lock doesn't interfere with trunk lid movement or compartment access.